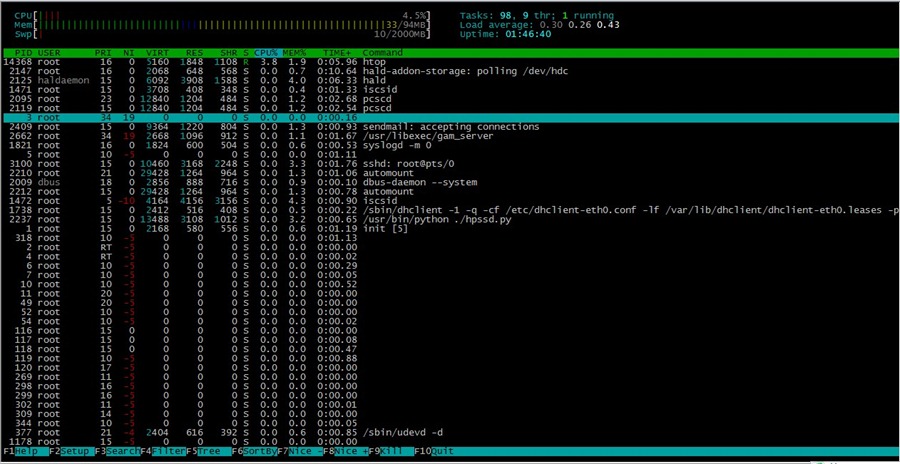
Centos下取代top的进程管理工具 htop
官网 http://htop.sourceforge.net/
安装:
yum install htop
# 如果以上无法安装;请登入官网下载,然后运行以下命令安装
yum install ncurses-devel
tar zxvf htop-*.tar.gz
cd htop-*
./configure
make && make install
#htop
官网 http://htop.sourceforge.net/
安装:
yum install htop
# 如果以上无法安装;请登入官网下载,然后运行以下命令安装
yum install ncurses-devel
tar zxvf htop-*.tar.gz
cd htop-*
./configure
make && make install
#htop
cpulimit 命令的工作原理是为进程预设一个 cpu 占用率门限,并实时监控进程是否超出此门限,若超出则让该进程暂停运行一段时间。cpulimit 使用 SIGSTOP 和 SIGCONT 这两个信号来控制进程。它不会修改进程的 nice 值,而是通过监控进程的 cpu 占用率来做出动态调整。
cpulimit 的优势是可以控制进程的cpu使用率的上限值。但与 nice 相比也有缺点,那就是即使 cpu 是空闲的,进程也不能完全使用整个 cpu 资源。
在 CentOS 上,可以用下面的方法来安装它:
wget -O cpulimit.zip https://github.com/opsengine/cpulimit/archive/master.zip
unzip cpulimit.zip
cd cpulimit-master
make
sudo cp src/cpulimit /usr/bin
上面的命令行,会先从从 GitHub 上将源码下载到本地,然后再解压、编译、并安装到 /usr/bin 目录下。
cpulimit 的使用方式和 nice 命令类似,但是需要用户使用 -l 选项显式地定义进程的 cpu 使用率上限值。举例说明:
cpulimit -l 50 matho-primes 0 9999999999 > /dev/null &
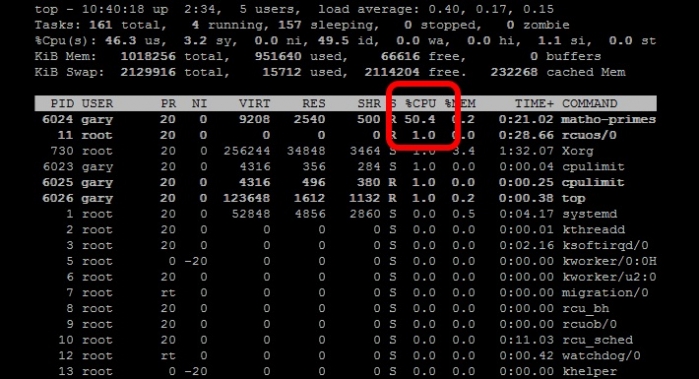
从上面的例子可以看出 matho-primes 只使用了50%的 cpu 资源,剩余的 cpu 时间都在 idle。
cpulimit 其他实例:
cpulimit -e httpd --limit 40 #限制httpd(进程名)的cpu使用率为40%
cpulimit -e /usr/local/bin/httpd --limit 40
cpulimit -p 2960 -l 55 #限制pid为2960的进程的CPU占用为55%
使用帮助:
Usage: cpulimit [OPTIONS...] TARGET
OPTIONS
-l, --limit=N percentage of cpu allowed from 0 to 3200 (required)
-v, --verbose show control statistics
-z, --lazy exit if there is no target process, or if it dies
-i, --include-children limit also the children processes
-h, --help display this help and exit
TARGET must be exactly one of these:
-p, --pid=N pid of the process (implies -z)
-e, --exe=FILE name of the executable program file or path name
COMMAND [ARGS] run this command and limit it (implies -z)
参考:https://linux.cn/article-4742-1.html
functions.php中添加以下代码
// 移除wordpress顶部工具栏css样式
add_action('get_header', 'remove_admin_login_header');
function remove_admin_login_header() {
remove_action('wp_head','_admin_bar_bump_cb');
}
Our PHP-Selector work wtih DirectAdmin only if PHP is running in suphp or fcgi mode. Here is the complete set of commands to enable selector on DA with suphp :
/usr/local/directadmin/custombuild/build set suphp yes
/usr/local/directadmin/custombuild/build set cloudlinux yes
/usr/local/directadmin/custombuild/build update
/usr/local/directadmin/custombuild/build apache
/usr/local/directadmin/custombuild/build php y
/usr/local/directadmin/custombuild/build suphp
/usr/local/directadmin/custombuild/build rewrite_confs
cagefsctl --force-update
cagefsctl --remount-all
Same way for fcgi mode.
http://kb.cloudlinux.com/2014/12/php-selector-and-directadmin/
1) 文件内全部替换:
:%s#abc#123#g (如文件内有#,可用/替换,:%s/abc/123/g)
--注:把abc替换成123
(或者: %s/str1/str2/g 用str2替换文件中所有的str1)
2) 文件内局部替换:
:20,30s#abc#123(如文件内有#,可用/替换,:%s/abc/123/g)
--注:把20行到30行内abc替换成123
当我们启用Suhosin,DA的phpmyadmin会报错,如下:
Server running with Suhosin. Please refer to documentation for possible issues.
是由于权限问题,Suhosin禁止了phpmyadmin部分操作;我们添加例外即可。执行
php -i | grep "Loaded Configuration File"
查看php.ini文件位置,编辑最底下添加
[PATH=/var/www/html/phpMyAdmin]
suhosin.simulation = On
保存后退出重启apache生效即可
1) 创建一个新文件 /etc/yum.repos.d/city-fan.repo
2) 复制下面的到上面文件中:
[CityFan]
name=City Fan Repo
baseurl=http://www.city-fan.org/ftp/contrib/yum-repo/rhel6/x86_64/
enabled=1
gpgcheck=0
3) 操作:
yum clean all
yum install curl
在ThinkPHP里面通过自动验证定义来验证数据的长度是否符合要求,在你的模型类里面添加下面的定义即可:
protected $_validate = array(
array('title','5,100','标题长度不符!',3,'length'), // 验证标题长度
array('phone','11','电话长度不符!',3,'length'), // 验证电话号码长度
);