2015年1月

In this section, we will analyze real-world examples of programs that
call the gethostbyname*() functions, but we first introduce a small test
program that checks whether a system is vulnerable or not:

[user@...ora-19 ~]$ cat > GHOST.c << EOF
#include <netdb.h>
#include <stdio.h>
#include <stdlib.h>
#include <string.h>
#include <errno.h>

#define CANARY "in_the_coal_mine"

struct {
  char buffer[1024];
  char canary[sizeof(CANARY)];
} temp = { "buffer", CANARY };

int main(void) {
  struct hostent resbuf;
  struct hostent *result;
  int herrno;
  int retval;

  /*** strlen (name) = size_needed - sizeof (*host_addr) - sizeof (*h_addr_ptrs) - 1; ***/
  size_t len = sizeof(temp.buffer) - 16*sizeof(unsigned char) - 2*sizeof(char *) - 1;
  char name[sizeof(temp.buffer)];
  memset(name, '0', len);
  name[len] = '\0';

  retval = gethostbyname_r(name, &resbuf, temp.buffer, sizeof(temp.buffer), &result, &herrno);

  if (strcmp(temp.canary, CANARY) != 0) {
    puts("vulnerable");
    exit(EXIT_SUCCESS);
  }
  if (retval == ERANGE) {
    puts("not vulnerable");
    exit(EXIT_SUCCESS);
  }
  puts("should not happen");
  exit(EXIT_FAILURE);
}
EOF

[user@...ora-19 ~]$ gcc GHOST.c -o GHOST

On Fedora 19 (glibc-2.17):

[user@...ora-19 ~]$ ./GHOST
vulnerable

On Fedora 20 (glibc-2.18):

[user@...ora-20 ~]$ ./GHOST
not vulnerable

修复漏洞
升级glibc库

RHEL/CentOS : sudo yum update glibc
Ubuntu : sudo apt-get update ; sudo apt-get install libc6

参考:http://www.openwall.com/lists/oss-security/2015/01/27/9

xmlrpc

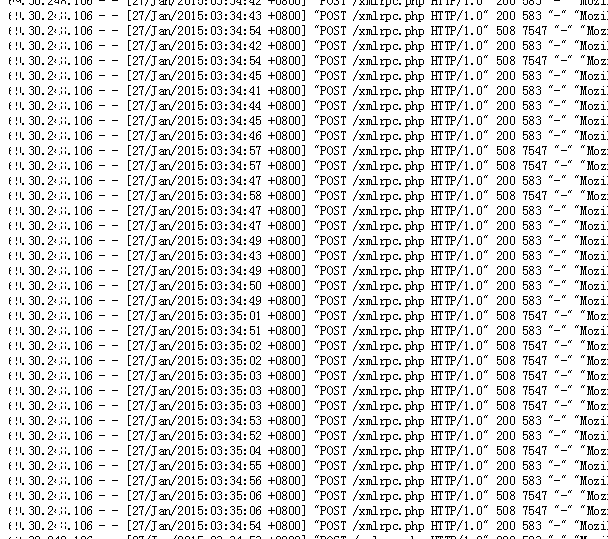
早上收到DNSPOD的网站宕机报告,访问看了下是被CloudLinux挂起了,资源使用超过限制。于是进去DA,查看Apache日记,看到xmlrpc.php不断被post,有人在尝试爆破后台,这种方式可以绕过WP后台的登录错误限制。解决办法可以安装 Login Security Solution 插件防御。

The following mini script is used to convert existing database tables to UTF-8. Upload the script to your account as "convert.php" and modify the database connection parameters and the character set, then execute the script.

To execute the script, you simply would visit the script in any web browser. If you upload the file to your public_html folder you'd visit "http://your-domain.com/convert.php".

Don't forget to replace your-domain.com with your actual domain name. Also, to get your languages to work on your site the collation will need to be utf8.

Code to convert your database to UTF-8

<?php  
     
// Fill in your Server, User, Database, Password, and Collation configuration below   
$db_server = 'localhost';   
$db_user = 'database user';   
$db_password = 'password';   
$db_name = 'database name';   
$char_set = 'new character set';  


// Adds the header information
header('Content-type: text/plain');  


// Connects to the MySQL database    
$connection = mysql_connect($db_server, $db_user, $db_password) or die(mysql_error() );      
$db = mysql_select_db($db_name) or die( mysql_error() ); 


// Runs the SQL query on teh database     
$sql = 'SHOW TABLES'; $result = mysql_query($sql) or die( mysql_error() ); 


// Runs a loop that finds all collations within the database and changes it to the new collation    
   while ( $row = mysql_fetch_row($result) )   {     
      $table = mysql_real_escape_string($row[0]);  
      $sql = "ALTER TABLE $table CONVERT TO CHARACTER SET $char_set COLLATE utf8_general_ci";     
      mysql_query($sql) or die( mysql_error() );       
      print "$table changed successfully.\n";  
   }    


// Update the Collation of the database itself  
$sql = "ALTER DATABASE CHARACTER SET $char_set;";  
mysql_query($sql) or die( mysql_error());     
print "Database collation has been updated successfully.\n";     


// close the connection to the database  
mysql_close($connection);     


?>
Note! You can use this script to change the database to any character set you wish. You need to define the character set in the script to change character sets:
$char_set = 'character set';

You will need the change the utf8_general_ci to match the character set you defined in the step above. So, if you want to change the character set to "Hebrew" you'd change the line to:

$sql = "ALTER TABLE $table CONVERT TO CHARACTER SET $char_set COLLATE hebrew_general_ci";

转载:http://www.inmotionhosting.com/support/website/databases/how-to-convert-a-database-to-utf-8

This is one of the most common topics that I see customers will ask about. As highly important as PHP handlers are, they often the least understood. They seem complicated, but its not too hard to understand. You don’t have to know that exact science of how it all works, but one should learn the basics if you want to take your website seriously. Picking the right PHP handler for your website will give you the optimal speeds you want and maybe allow you to save some money by using a cheaper hosting package. So I invite you to take a few minutes and learn something new.

What are PHP handlers

In order to run a PHP site, the server must interpret the PHP code and generate a page when visitors access the website. It interprets the code based on which PHP library you are using, such as PHP 4 or PHP 5. A PHP handler is what actually loads the libraries so that they can be used for interpretation. PHP handlers determine how PHP is loaded on the server.

There are multiple different handlers that can be used for loading PHP: CGI, DSO, suPHP, & FastCGI. Each handler delivers the libraries through different files and implementations. Each file and implementation affects Apache’s performance, because it determines how Apache serves PHP.

It is critical for your server’s performance that you select the handler that fits your situation. Selecting the right handler is just as important as the PHP version itself. One handler is not necessarily always better than another; it depends on your unique setup. What caching do you need, what modules do you need, etc…

  • Note: You may assign different PHP handlers to different versions of PHP. For example, version 5 may be handled by CGI while PHP 4 is handled by DSO.

How to change the handler

Changing the handler on cPanel is very easy to do and only takes seconds. Log into WHM and navigate to: Main >> Service Configuration >> Configure PHP and SuExec

You simply select your PHP handler choice from the drop-down menu. Then hit “Save New Configuration”.

  • Note: If you do not see your desired choice in the drop-down menu, it may need to be compiled on the server first. Run an “Easy Apache” to compile it.

List of PHP handlers

DSO (mod_php)

DSO is also known as mod_php. DSO stands for: Dynamic Shared Object. This is an older configuration but is generally considered the fastest handler. It runs PHP as an Apache module. This means that PHP scripts will run as the Apache user, which is the user: ‘nobody’.

DSO has two drawbacks. First, all files created by a PHP script will have the ownership of ‘nobody’. They will not be readable from the web. Websites that need to upload files through PHP will run into file permission issues. This is common with WordPress users that upload files through the WordPress interface or utilize the auto-update feature. These will fail with DSO.

The second drawback is a security issue. Created files will have the ‘nobody’ ownership. If a hacker finds an exploit in your PHP script, they could implement a file that has the same privileges as important system files that are also owned by ‘nobody’. This will give them the ability to modify files outside of that user’s account. This is really bad for anyone who does reselling or simply is hosting other person’s sites. You would not one user to be able to affect another user. However, if there is only one account on the server (or if all the accounts are yours), then DSO may be right for you. The speeds benefits of DSO are unquestionable.

An easy way to prevent the hack issue is to always keep your site’s software up to date. Check with your PHP script’s developer to keep up on the new releases. If you are the only one being hosted on the server, this is easy to do as it’s part of your webmaster duties already. However, if you’re reselling, it would be unreasonable to expect all your user’s to keep their software up to date. They simply may not be as diligent as you.

DSO’s low CPU usage typically amounts in higher speeds and load times over most other handlers. It is also the default setting on most servers.

CGI

CGI stands for: Common Gateway Interface. The CGI handler will run PHP as a CGI module as opposed to an Apache module. CGI still runs PHP processes as the Apache ‘nobody’ user. However, if you have suEXEC enabled, it will allow you to see the user that made the request.

The CGI method is intended as a fallback handler for when DSO is not available. According to cPanel’s own documentation, this method is neither fast nor secure, regardless of whether or not suEXEC is enabled.

http://docs.cpanel.net/twiki/bin/view/AllDocumentation/WHMDocs/MorePhphandlers

suPHP

suPHP stands for Single user PHP. suPHP also runs PHP as a CGI module instead of an Apache module. It differs from CGI in that PHP scripts that are called from the web will run under the user that owns them, as opposed to ‘nobody’. suPHP is typically the default handler and is recommended by cPanel for serving PHP because you will be able to see which user owns the account that is running the PHP script.

suPHP is beneficial in that if you are using a file upload tool on your site (such as an automatic updater or theme/plug-in installer for WordPress), the files will already have the right ownership & permissions. Uploading and other WordPress functions will not work without suPHP or FastCGI.

suPHP also offers a security advantage that any php script that is not owned by the particular user (such as another account or root) will not be executable. Also, files that have permissions set to world writeable will likewise be non-executable. This means that if one account is compromised, the malicious scripts will not be able to infect other accounts.

The drawback is that suPHP generally runs a much higher CPU load. In addition, you CANNOT use an Opcode Cache (such as Xcache or APC) with suPHP. It is strongly recommend that you install a caching plug-in to supplement this ned. If you find that your server is still continually struggling with CPU usage, you will want to consider switching to DSO or FastCGI.

*If you DO switch to either suPHP or FastCGI, you will need to update the file permissions and ownership. See my other article for automatic fixperms on cPanel servers: http://boomshadow.net/tech/fixes/fixperms-script/

FastCGI

FastCGI (aka: mod_fcgid or FCGI) is a high performance variation of CGI. It has the security/ownership benefits of suPHP in that PHP scripts will run as the actual cPanel user as opposed to ‘nobody’. The difference with FastCGI is that it can drastically save on CPU performance and give speeds close to that of DSO. It can also be used with an opcode cacher like eAccelerator or APC, which can help further speed the loading of pages.

The drawback is FastCGI has a high memory usage. This is because rather than creating the PHP process each time it is called, like suPHP, it keeps a persistent session open in the background. This is what lets it work with an opcode caching software.

If you like the security/ownership benefits of suPHP and you can afford a major increase in memory usage (meaning you already have a low average memory usage), you may wish to consider using FastCGI.

Comparison Graph

DSO CGI SuPHP FastCGI
Low CPU usage
Low Memory consumption
Runs PHP as site owner instead of Apache

only w/ suEXEC
Good security

Special Note for WordPress Users

If you are using WordPress to run your site, please consider the following:

  • Functions that require uploading files to the server (such as Auto-updates or Plug-in/Theme installation) will NOT work unless PHP is loaded as a CGI module. This means they will ONLY work with suPHP or FastCGI. This will ensure they are uploaded with the correct ownership & permissions.
  • CMS platforms such as WordPress will notoriously run a high CPU load. You will want to install a caching plug-in such as WP Super Cache, especially if you are running suPHP. If you find that your server is still continually struggling with CPU usage, you may want to consider switching to DSO or FastCGI.

转载:http://boomshadow.net/tech/php-handlers/
方法1: 用file_get_contents 以get方式获取内容

<?php  
$url='http://www.domain.com/';  
$html = file_get_contents($url);  
echo $html;  
?>  

方法2: 用fopen打开url, 以get方式获取内容

<?php  
$fp = fopen($url, 'r');  
//返回请求流信息(数组:请求状态,阻塞,返回值是否为空,返回值http头等)  
stream_get_meta_data($fp); 
while(!feof($fp)) {  
$result .= fgets($fp, 1024);  
}  
echo "url body: $result";  
fclose($fp);  
?>  

方法3:用file_get_contents函数,以post方式获取url

<?php  
$data = array ('foo' => 'bar');  
//生成url-encode后的请求字符串,将数组转换为字符串  
$data = http_build_query($data);  
$opts = array (  
<span style="white-space:pre">  </span>'http' => array (  
<span style="white-space:pre">      </span>'method' => 'POST',  
<span style="white-space:pre">      </span>'header'=> "Content-type: application/x-www-form-urlencoded\r\n" .  
<span style="white-space:pre">      </span>"Content-Length: " . strlen($data) . "\r\n",  
<span style="white-space:pre">      </span>'content' => $data  
<span style="white-space:pre">  </span>)  
);  
//生成请求的句柄文件  
$context = stream_context_create($opts);  
$html = file_get_contents('http://localhost/e/admin/test.html', false, $context);  
echo $html;  
?>  

方法4:用fsockopen函数打开url,以get方式获取完整的数据,包括header和body,fsockopen需要 PHP.ini 中 allow_url_fopen 选项开启

<?php  
function get_url ($url,$cookie=false)  
{  
$url = parse_url($url);  
$query = $url[path]."?".$url[query];  
echo "Query:".$query;  
$fp = fsockopen( $url[host], $url[port]?$url[port]:80 , $errno, $errstr, 30);  
if (!$fp) {  
return false;  
} else {  
$request = "GET $query HTTP/1.1\r\n";  
$request .= "Host: $url[host]\r\n";  
$request .= "Connection: Close\r\n";  
if($cookie) $request.="Cookie:   $cookie\n";  
$request.="\r\n";  
fwrite($fp,$request);  
while()) {  
$result .= @fgets($fp, 1024);  
}  
fclose($fp);  
return $result;  
}  
}  
//获取url的html部分,去掉header  
function GetUrlHTML($url,$cookie=false)  
{  
$rowdata = get_url($url,$cookie);  
if($rowdata)  
{  
$body= stristr($rowdata,"\r\n\r\n");  
$body=substr($body,4,strlen($body));  
return $body;  
}  
    return false;  
}  
?>  

方法5:用fsockopen函数打开url,以POST方式获取完整的数据,包括header和body

<?php  
function HTTP_Post($URL,$data,$cookie, $referrer="")  
{  
    // parsing the given URL  
$URL_Info=parse_url($URL);  
    // Building referrer  
if($referrer=="") // if not given use this script as referrer  
$referrer="111";  
    // making string from $data  
foreach($data as $key=>$value)  
$values[]="$key=".urlencode($value);  
$data_string=implode("&",$values);  
    // Find out which port is needed - if not given use standard (=80)  
if(!isset($URL_Info["port"]))  
$URL_Info["port"]=80;  
    // building POST-request:  
$request.="POST ".$URL_Info["path"]." HTTP/1.1\n";  
$request.="Host: ".$URL_Info["host"]."\n";  
$request.="Referer: $referer\n";  
$request.="Content-type: application/x-www-form-urlencoded\n";  
$request.="Content-length: ".strlen($data_string)."\n";  
$request.="Connection: close\n";  
    $request.="Cookie:   $cookie\n";  
    $request.="\n";  
$request.=$data_string."\n";  
    $fp = fsockopen($URL_Info["host"],$URL_Info["port"]);  
fputs($fp, $request);  
while(!feof($fp)) {  
$result .= fgets($fp, 1024);  
}  
fclose($fp);  
    return $result;  
}  
?>  

方法6:使用curl库,使用curl库之前,可能需要查看一下php.ini是否已经打开了curl扩展

<?php  
$ch = curl_init();  
$timeout = 5;  
curl_setopt ($ch, CURLOPT_URL, 'http://www.domain.com/');  
curl_setopt ($ch, CURLOPT_RETURNTRANSFER, 1);  
curl_setopt ($ch, CURLOPT_CONNECTTIMEOUT, $timeout);  
$file_contents = curl_exec($ch);  
curl_close($ch);  
echo $file_contents;  
?>  

转载:http://blog.csdn.net/haha00217/article/details/7969504

Server Shield是一款轻量级的系统保护和强化工具

它的功能包括:

Firewall Hardening 防火墙强化
TCP Hardening TCP强化
Data Leakage Protection 防泄保护
ICMP/Ping Flood Protection ICMP/Ping攻击保护
Rootkit Protection Rootkit保护
DoS Protection DDOS保护
Spoof Protection Spoof保护
Bogus TCP Protection Bogus TCP保护
SYN Flood Protection 洪水攻击保护
FTP/SSH 暴力破解保护
等……

依赖软件

yum-security
iptables
net-tools
sed
gawk
git

安装

git clone https://github.com/bluedragonz/server-shield

cd server-shield;chmod +x sshield;mv sshield /etc/init.d

/etc/init.d/sshield start    

项目地址:https://github.com/bluedragonz/server-shield

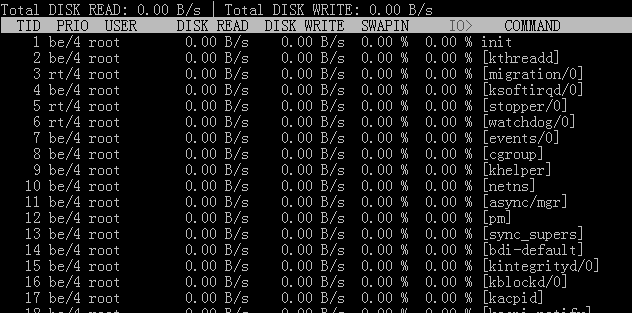
yum -y install iotop  或
sudo apt-get install iotop

官网:http://guichaz.free.fr/iotop/

io

用法 iotop -参数

–version 查看版本信息的

-h, –help 查看帮助信息的

-o, –only 只显示在划硬盘的程序
-b, –batch 批量处理 用来记录日志的

-n NUM 设定循环几次

-d SEC, –delay=SEC 设定显示时间间隔

其中按 r 是反顺序排列,按 o 为动态切换,按q退出。

1.选择Free行,再点击Create按钮;
1

2.选择“Create Partition”选项中的“Standard Partition”,然后点击Create;
2

3.在挂载点上选择“/boot”,文件系统类型中选择“ext4”,大小填写100(单位为MB),然后在“Additional Size Options”区域选择“Fixed size”选项,最后再勾选“Force to be a primary partition”,最最后点击OK按钮;
3

4.选择剩下来的Free行,点击Create按钮,在弹出的对话框中选择“Create LVM”选项中的“LVM Physical Volume”单选按钮,最后单击Create;
4

5.在弹出的“Add Partition”对话框中,在“Additional Size Options”区域选择“Force to be a primary size”选项,最后再勾选“Force to be a primary partition”,最最后点击OK按钮;
5

6.选中sda2这一行,单击“Create”按钮,(千万不要单击“Edit”,不然的话,会回到Standard Partition模式)
6

7.在弹出的“Create Storage”对话框中,选择“Create LVM”区域中的“LVM Volume Group”选项,最后单击Create按钮;
7

8.在弹出的“Make LVM Volume Group”对话框中,指定“Volume Group Name”的名称(不能包含空格)和“Physical Extent”的大小,默认为4M,最后点击OK按钮;(也可以在这里直接点击Add按钮添加LVM logical Volume)
8

9.单击上图中的Add按钮,在弹出的“Create Storage”中选择“Create LVM”区域中的“LVM Logical Volume”,最后单击Create按钮;
9

10.在弹出的“Make Logical Volume”对话框中指定挂载点、文件系统类型、逻辑卷的名字和卷的大小,最后单击OK按钮;(如果文件系统类型为swap,则没有挂载点)
10

11.接着挂载根(/);
11

12.最后分区图如下:
12

13.挂载所有分区后的截图如下:
13

参考:http://www.newsky.net.cn/help/Show.asp?id=13

使用dd命令创建一个swap分区

[root@localhost Desktop]#dd if=/dev/zero of=/home/swap bs=1024 count=1048576

#count的计算公式: count=SIZE*1024 (size以MB为单位)
这样就建立一个/home/swap的分区文件,大小为1G,接着需要格式化新建的SWAP分区:

[root@localhost Desktop]# mkswap /home/swap

再用swapon命令把这个文件分区变成swap分区

[root@localhost Desktop]#swapon /home/swap
#关闭SWAP分区命令为:[root@localhost Desktop]#swapoff /home/swap

再用free -m查看一下,可以看出swap扩大了。

为了能够让swap自动挂载,要修改/etc/fstab文件

vi /etc/fstab
在文件末尾加上
/home/swap swap swap default 0 0

这样就算重启系统,swap分区就不用手动挂载了。

参考:http://blog.chinaunix.net/uid-26881541-id-3347389.html

源代码安装

yum remove curl curl-devel
 
wget http://curl.haxx.se/download/curl-7.24.0.tar.bz2
tar xfj curl-7.24.0.tar.bz2
cd curl-7.24.0
./configure --prefix=/usr
make
make install
#check version
curl -V
./configure --with-curl=/usr --with-curlwrappers

参考:http://gadelkareem.com/2012/02/27/upgrade-curl-7-24-on-centos-6-2/