CentOS里下载百度网盘资源的方法
wget -c --referer=引用地址 -O 文件名 "真实下载地址"
wget -c --referer=引用地址 -O 文件名 "真实下载地址"
In this section, we will analyze real-world examples of programs that
call the gethostbyname*() functions, but we first introduce a small test
program that checks whether a system is vulnerable or not:
[user@...ora-19 ~]$ cat > GHOST.c << EOF
#include <netdb.h>
#include <stdio.h>
#include <stdlib.h>
#include <string.h>
#include <errno.h>

#define CANARY "in_the_coal_mine"

struct {
  char buffer[1024];
  char canary[sizeof(CANARY)];
} temp = { "buffer", CANARY };

int main(void) {
  struct hostent resbuf;
  struct hostent *result;
  int herrno;
  int retval;

  /*** strlen (name) = size_needed - sizeof (*host_addr) - sizeof (*h_addr_ptrs) - 1; ***/
  size_t len = sizeof(temp.buffer) - 16*sizeof(unsigned char) - 2*sizeof(char *) - 1;
  char name[sizeof(temp.buffer)];
  memset(name, '0', len);
  name[len] = '\0';

  retval = gethostbyname_r(name, &resbuf, temp.buffer, sizeof(temp.buffer), &result, &herrno);

  if (strcmp(temp.canary, CANARY) != 0) {
    puts("vulnerable");
    exit(EXIT_SUCCESS);
  }
  if (retval == ERANGE) {
    puts("not vulnerable");
    exit(EXIT_SUCCESS);
  }
  puts("should not happen");
  exit(EXIT_FAILURE);
}
EOF

[user@...ora-19 ~]$ gcc GHOST.c -o GHOST

On Fedora 19 (glibc-2.17):

[user@...ora-19 ~]$ ./GHOST
vulnerable

On Fedora 20 (glibc-2.18):

[user@...ora-20 ~]$ ./GHOST
not vulnerable
修复漏洞
升级glibc库
RHEL/CentOS : sudo yum update glibc
Ubuntu : sudo apt-get update ; sudo apt-get install libc6
参考:http://www.openwall.com/lists/oss-security/2015/01/27/9
Server Shield是一款轻量级的系统保护和强化工具
它的功能包括:
Firewall Hardening 防火墙强化
TCP Hardening TCP强化
Data Leakage Protection 防泄保护
ICMP/Ping Flood Protection ICMP/Ping攻击保护
Rootkit Protection Rootkit保护
DoS Protection DDOS保护
Spoof Protection Spoof保护
Bogus TCP Protection Bogus TCP保护
SYN Flood Protection 洪水攻击保护
FTP/SSH 暴力破解保护
等……
依赖软件
yum-security
iptables
net-tools
sed
gawk
git
安装
git clone https://github.com/bluedragonz/server-shield

cd server-shield;chmod +x sshield;mv sshield /etc/init.d

/etc/init.d/sshield start
项目地址:https://github.com/bluedragonz/server-shield
yum -y install iotop  或
sudo apt-get install iotop
官网:http://guichaz.free.fr/iotop/
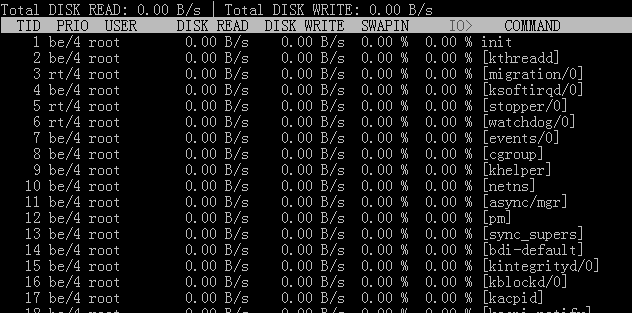
用法 iotop -参数
–version 查看版本信息的
-h, –help 查看帮助信息的
-o, –only 只显示在划硬盘的程序
-b, –batch 批量处理 用来记录日志的
-n NUM 设定循环几次
-d SEC, –delay=SEC 设定显示时间间隔
其中按 r 是反顺序排列,按 o 为动态切换,按q退出。
1.选择Free行,再点击Create按钮;
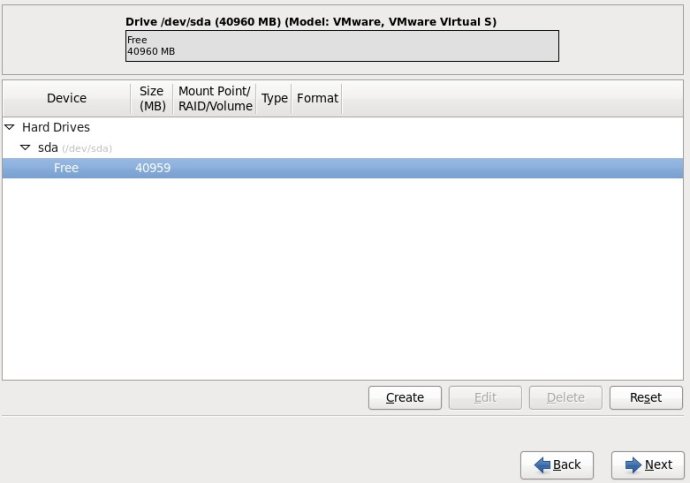
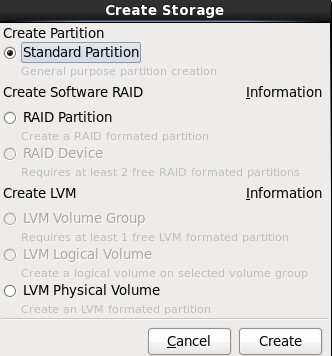
2.选择“Create Partition”选项中的“Standard Partition”,然后点击Create;
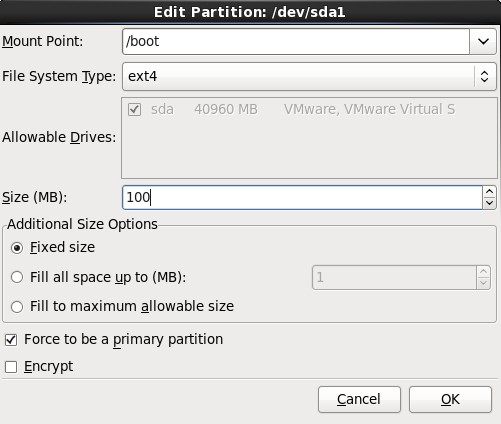
3.在挂载点上选择“/boot”,文件系统类型中选择“ext4”,大小填写100(单位为MB),然后在“Additional Size Options”区域选择“Fixed size”选项,最后再勾选“Force to be a primary partition”,最最后点击OK按钮;
4.选择剩下来的Free行,点击Create按钮,在弹出的对话框中选择“Create LVM”选项中的“LVM Physical Volume”单选按钮,最后单击Create;

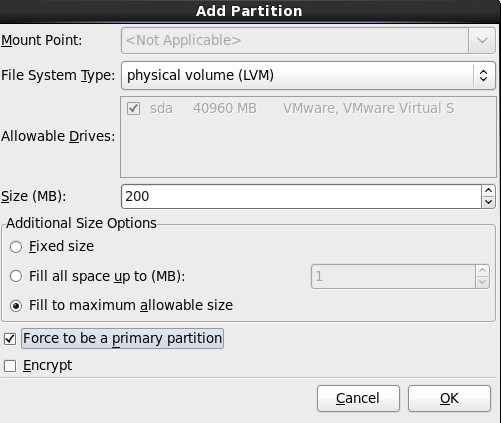
5.在弹出的“Add Partition”对话框中,在“Additional Size Options”区域选择“Force to be a primary size”选项,最后再勾选“Force to be a primary partition”,最最后点击OK按钮;
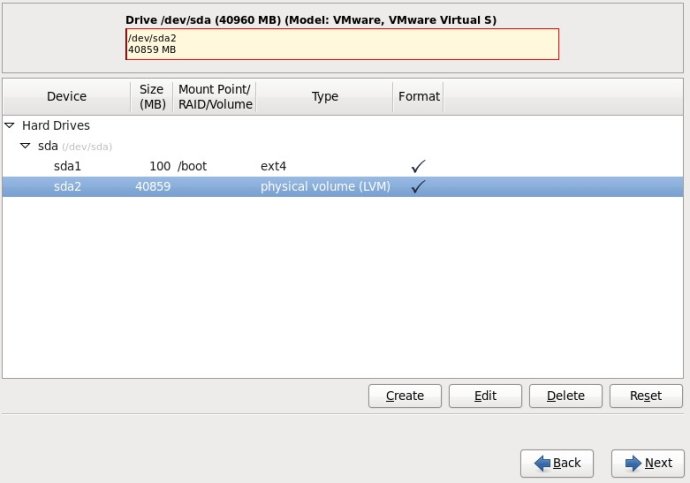
6.选中sda2这一行,单击“Create”按钮,(千万不要单击“Edit”,不然的话,会回到Standard Partition模式)
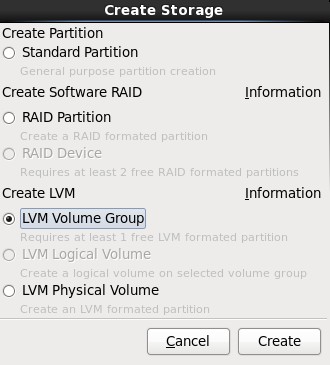
7.在弹出的“Create Storage”对话框中,选择“Create LVM”区域中的“LVM Volume Group”选项,最后单击Create按钮;
8.在弹出的“Make LVM Volume Group”对话框中,指定“Volume Group Name”的名称(不能包含空格)和“Physical Extent”的大小,默认为4M,最后点击OK按钮;(也可以在这里直接点击Add按钮添加LVM logical Volume)
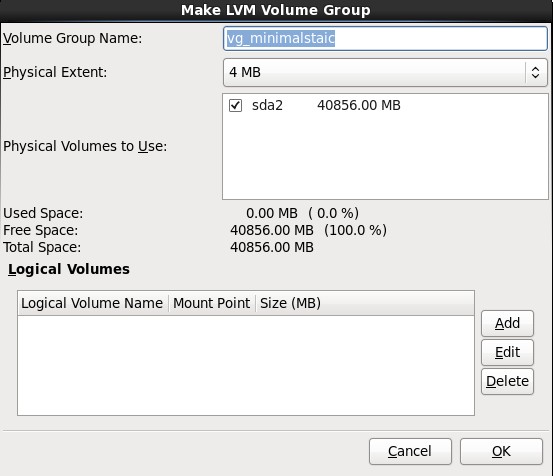
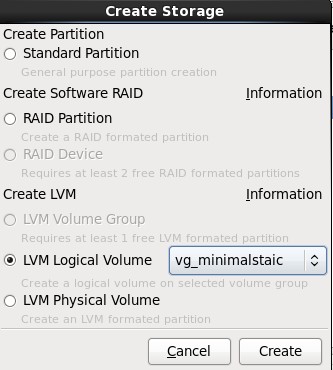
9.单击上图中的Add按钮,在弹出的“Create Storage”中选择“Create LVM”区域中的“LVM Logical Volume”,最后单击Create按钮;
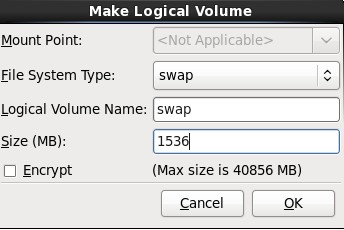
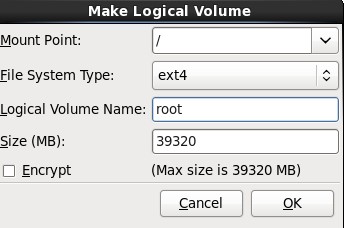
10.在弹出的“Make Logical Volume”对话框中指定挂载点、文件系统类型、逻辑卷的名字和卷的大小,最后单击OK按钮;(如果文件系统类型为swap,则没有挂载点)
11.接着挂载根(/);
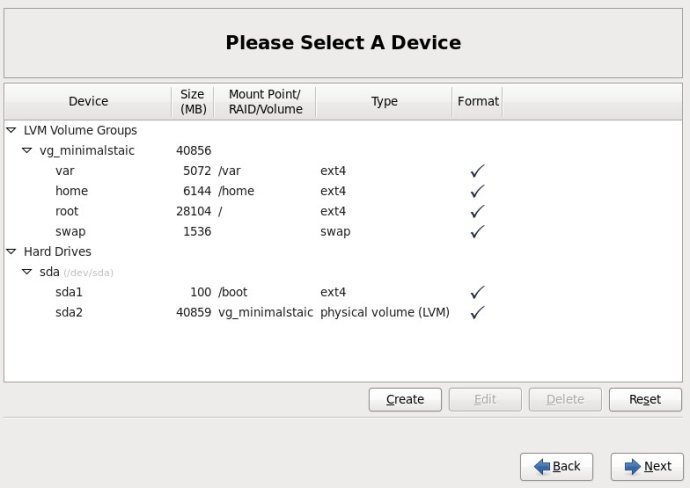
12.最后分区图如下:
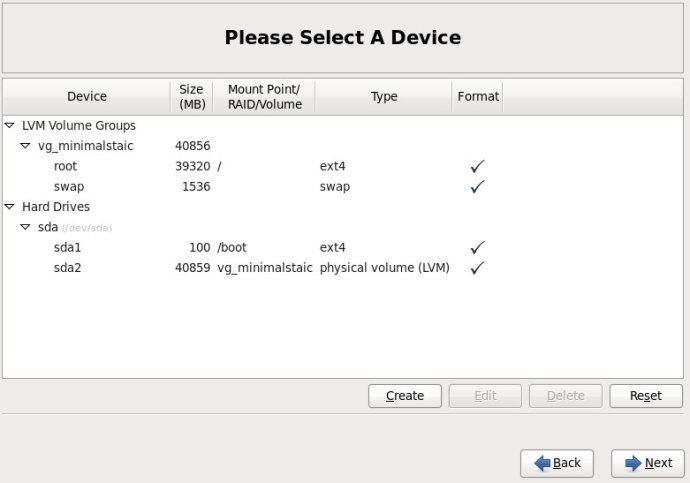
13.挂载所有分区后的截图如下:
参考:http://www.newsky.net.cn/help/Show.asp?id=13
使用dd命令创建一个swap分区
[root@localhost Desktop]#dd if=/dev/zero of=/home/swap bs=1024 count=1048576
#count的计算公式: count=SIZE*1024 (size以MB为单位)
这样就建立一个/home/swap的分区文件,大小为1G,接着需要格式化新建的SWAP分区:
[root@localhost Desktop]# mkswap /home/swap
再用swapon命令把这个文件分区变成swap分区
[root@localhost Desktop]#swapon /home/swap
#关闭SWAP分区命令为:[root@localhost Desktop]#swapoff /home/swap
再用free -m查看一下,可以看出swap扩大了。
为了能够让swap自动挂载,要修改/etc/fstab文件
vi /etc/fstab
在文件末尾加上
/home/swap swap swap default 0 0
这样就算重启系统,swap分区就不用手动挂载了。
参考:http://blog.chinaunix.net/uid-26881541-id-3347389.html
源代码安装
yum remove curl curl-devel

wget http://curl.haxx.se/download/curl-7.24.0.tar.bz2
tar xfj curl-7.24.0.tar.bz2
cd curl-7.24.0
./configure --prefix=/usr
make
make install
#check version
curl -V
./configure --with-curl=/usr --with-curlwrappers
参考:http://gadelkareem.com/2012/02/27/upgrade-curl-7-24-on-centos-6-2/
1、获取Squid源代码
wget http://www.squid-cache.org/Versions/v3/3.1/squid-3.1.9.tar.gz
2、编译及安装
tar -zxvf squid-3.1.9.tar.gz
cd squid-3.1.9
./configure --prefix=/usr/local/squid --enable-arp-acl --enable-linux-netfilter --enable-pthreads --enable-err-language="Simplify_Chinese" --enable-default-err-language="Simplify_Chinese" --enable-auth="basic" --enable-baisc-auth-helpers="NCSA" --enable-underscore
make
make install
3、编译生成Squid认证程序ncsa_auth
cd helpers/basic_auth/NCSA/
make
cp ncsa_auth /usr/sbin/
cd ../../../
4、使用htpasswd来生成用户名/密码对应的文件
htpasswd -c /usr/local/squid/password <用户名>
5、修改Squid配置文件
cd /usr/local/squid/
mv -f etc/squid.conf etc/squid.conf.bak
vi etc/squid.conf

# 插入如下内容


acl SSL_ports port 443
acl Safe_ports port 80      # http
acl Safe_ports port 21      # ftp
acl Safe_ports port 443     # https
acl Safe_ports port 70      # gopher
acl Safe_ports port 210     # wais
acl Safe_ports port 1025-65535  # unregistered ports
acl Safe_ports port 280     # http-mgmt
acl Safe_ports port 488     # gss-http
acl Safe_ports port 591     # filemaker
acl Safe_ports port 777     # multiling http
acl CONNECT method CONNECT

auth_param basic program /usr/sbin/ncsa_auth /usr/local/squid/password
acl normal proxy_auth REQUIRED
http_access allow normal

# Deny requests to certain unsafe ports
http_access deny !Safe_ports

# Deny CONNECT to other than secure SSL ports
http_access deny CONNECT !SSL_ports

# And finally deny all other access to this proxy
http_access deny all

# Squid normally listens to port 3128
http_port 3128

# We recommend you to use at least the following line.
hierarchy_stoplist cgi-bin ?

# Uncomment and adjust the following to add a disk cache directory.
#cache_dir null /tmp

# Leave coredumps in the first cache dir
coredump_dir /usr/local/squid/var/cache

# Add any of your own refresh_pattern entries above these.
refresh_pattern ^ftp:       1440    20% 10080
refresh_pattern ^gopher:    1440    0%  1440
refresh_pattern -i (/cgi-bin/|\?) 0 0%  0
refresh_pattern .       0   20% 4320
6、启动Squid
./sbin/squid
转载:http://www.oschina.net/code/snippet_4873_1535
安装教程
cd /usr/local/src
wget http://techsware.in/downloads/harden.sh
chmod 755 harden.sh
./harden.sh
1:什么是KalluscPHarden?
答:KalluscPHarden是一个shell脚本,基于cPanel服务器安全加固、检查。
2:会为cPanel做什么?
答:改变调整设置,密码修改强度,后台进程检查,编译器的访问安全,Shell Bomb Fork保护等设置....
3:有什么额外的应用程序将安装到服务器?
答:CSF,CMM,CMQ,CMC,Maldet,Rkhunter,Linux Socket 监控,Linux的环境安全等
4:服务器会有哪些地方被调整/加固?
答:Apache,cPanel,FTP,SSH,MySQL,CSF,PHP等
5: What additional hardening steps it does ?
Ans : TMP hardening, Logrotate hardening, Daily Rkhunter scanning, rDNS Check, Disable unwanted processes, SYN FLOOD Kernel Tweak, etc
6: How to recover the old configuration, before running this tool?
Ans : All configurations will be backup as conf_file.beforetweak before making changes to it. So you can compare the configurations in you want to check anything.
7: Any more tweaks it do ?
Ans : Check change log for recent changes to the script
8:这个脚本多少钱?
答:它是完全免费的。
9:想知道更多?
Ans : Please feel free to reach me at kallu[at]techsware.in
官方主页:http://techsware.in/kcpharden.html
SYNFLOOD is disabled by default. If you are not receiving any sort of attack, there is no need to enable it. If you are expecting an attack, enable it and set the rules a bit strict, like
SYNFLOOD_RATE = "5/s"
SYNFLOOD_BURST = "3"
i.e. if 5 connections are received from an IP/sec for 3 times, block it. Make sure don't keep it too strict if you are not receiving an attack else it will generate false positives and will block legit connections.
摘自:http://www.webhostingtalk.com/showthread.php?t=892958
Hello,
update script not part from directadmin.com
**** USE IT YOUR OWN RISKS *********
*****
*****GNU GENERAL PUBLIC LICENSE
Version 2, June 1991
Copyright (C) 2006,2007 Free Software Foundation, Inc.
51 Franklin St, Fifth Floor, Boston, MA 02110-1301 USA
Everyone is permitted to copy and distribute verbatim copies
of this license document, but changing it is not allowed.
Update script made by Wael Isa
H188, R4008, Arad 240, Kingdom of Bahrain
http://www.web4host.net
Version: 1.8.1
Release Date: 1 / 9 / 2006*****
*****
*****If you find update script useful, please consider to make a donation to support this freeware.
Please keep in mind that donations are welcome, but in no way required to use and distribute update.script.
You can support update.script by paypal – CLICK HEREupdate.script Version: 1.8.1
update script tested in this OS 32bit and 64bit.
- RedHat Linux
- RedHat Fedora
- RedHat Enterprise
- CentOS
- Debian
安装
mkdir /usr/local/updatescript
cd /usr/local/updatescript
wget http://tools.web4host.net/update.script
chmod 755 update.script
Run this to read how to use.
运行以下命令查看如何使用
./update.script
查看更多:http://www.web4host.net/update-script/
ELS stands for Easy Linux Security. ELS was created by Richard Gannon, Martynas Bendorius and Wael Isa. ELS takes many of the tasks performed by our Administrators and puts it into an easy to use program for anyone to use. It is released under the GNU/GPL so it is free to use.
This program is always being improved with new features and bugfixes, so be sure to keep it up to date. If you found a bug or would like an improvement, please let us know! If you really like this program, donations are welcome!
支持的操作系统 :
* Red Hat Linux
* Red Hat Enterprise Linux
* Fedora Core
* CentOS
* Debian
ELS 有哪些功能:
* Install RKHunter
* Install RKHunter Cronjob which emails a user-set email address nightly
* Install/update APF
* Install/update BFD
* Install CHKROOTKIT
* Install CHKROOTKIT Cronjob which emails a user-set email address nightly
* Disable Telnet
* Force SSH Protocol 2
* Secure /tmp
* Secure /var/tmp
* Secure /dev/shm
* 安装/升级 Zend Optimizer
* 安装/升级 eAccelerator
* MySQL 4.1 and 5.0 Configuration Optimization
* Upgrade MySQL to 5.0
* Tweak WHM Settings for security and stability
* Configure RNDC if not already done (cPanel only)
* Change SSH port (also configure APF as necessary)
* Add wheel user and disable direct root login over SSH
* 优化 MySQL tables
* 安装/升级 Libsafe
* 安装/升级 ImageMagick (from latest source)
* Uninstall LAuS
* Harden sysctl.conf
* Install Chirpy’s Free Exim Dictionary Attack ACL (cPanel only)
* 更多!
安装 ELS, 以ROOT身份运行以下命令:
wget -O installer.sh http://els.web4host.net/installer.sh
chmod +x installer.sh
sh installer.sh
官方网站:http://www.web4host.net/easy-linux-security/