CentOS下使用tcpdump网络抓包用
tcpdump是Linux下的截获分析网络数据包的工具,对优化系统性能有很大参考价值。
安装
tcpdump不是默认安装的,在CentOS下安装:
yum install tcpdump
在Ubuntu下安装:
apt-get install tcpdump
默认启动
tcpdump
普通情况下,直接启动tcpdump将监视第一个网络接口上所有流过的数据包。
tcpdump是Linux下的截获分析网络数据包的工具,对优化系统性能有很大参考价值。
安装
tcpdump不是默认安装的,在CentOS下安装:
yum install tcpdump
在Ubuntu下安装:
apt-get install tcpdump
默认启动
tcpdump
普通情况下,直接启动tcpdump将监视第一个网络接口上所有流过的数据包。
公司有台10个盘组的RAID10的服务器列阵挂了,坏了3个盘,超过了RAID10的容错,已经无法通过列阵恢复数据了。同时挂3个是很小几率的,所以也有一定可能刚开始挂了1-2个不知道,直到第3个挂了down机了才发现。
因为机器很多,人工每天检查一次会比较耗时,每周检查也许又会太长。所以写了个py小脚本,可以定时1小时检查次,出现故障可以立即通知到技术立即去进一步检查、换盘,避免悲剧发生。
1、安装MegaCLI
# wget https://raw.githubusercontent.com/crazy-zhangcong/tools/master/MegaCli8.07.10.tar.gz && tar -zxf MegaCli8.07.10.tar.gz && cd MegaCli8.07.10/Linux/ && rpm -ivh Lib_Utils-1.00-09.noarch.rpm MegaCli-8.02.21-1.noarch.rpm && ln -s /opt/MegaRAID/MegaCli/MegaCli64 /usr/local/bin/MegaCli && MegaCli -v
安装
wget https://raw.github.com/sivel/speedtest-cli/master/speedtest_cli.py
chmod a+rx speedtest_cli.py
sudo mv speedtest_cli.py /usr/local/bin/speedtest-cli
sudo chown root:root /usr/local/bin/speedtest-cli
使用
speedtest-cli
Axel 是 Linux 下一个不错的HTTP/FTP高速下载工具。支持多线程下载、断点续传,且可以从多个地址或者从一个地址的多个连接来下载同一个文件。适合网速不给力时多线程下载提高下载速度。比如在国内VPS或服务器上下载lnmp一键安装包用Axel就比wget快。
CentOS安装Axel:
目前yum源上没有Axel,我们可以到http://pkgs.repoforge.org/axel/下载rpm包安装。
32位CentOS执行下面命令:
wget -c http://pkgs.repoforge.org/axel/axel-2.4-1.el5.rf.i386.rpm
rpm -ivh axel-2.4-1.el5.rf.i386.rpm
64位CentOS执行下面命令:
wget -c http://pkgs.repoforge.org/axel/axel-2.4-1.el5.rf.x86_64.rpm
rpm -ivh axel-2.4-1.el5.rf.x86_64.rpm
Debian/Ubuntu安装Axel:
apt-get install axel
Axel命令使用方法:
axel 参数 文件下载地址
可选参数:
-n 指定线程数
-o 指定另存为目录
-s 指定每秒的最大比特数
-q 静默模式
如从Diahosting下载lnmp安装包指定10个线程,存到/tmp/:axel -n 10 -o /tmp/ http://soft.vpser.net/lnmp/lnmp0.7-full.tar.gz
如果下载过程中下载中断可以再执行下载命令即可恢复上次的下载进度。
原文:http://www.vpser.net/manage/axel.html
EPEL(Extra Packages for Enterprise Linux) 是由 Fedora 社区打造,为 RHEL 及衍生发行版如 CentOS等提供高质量软件包的项目。装上了 EPEL,就像在 Fedora 上一样,可以通过 yum install 软件包名,即可安装很多以前需要编译安装的软件、常用的软件或一些比较流行的软件,比如现在流行的nginx, openvpn等等,都可以使用EPEL很方便的安装更新。
安装EPEL源
CentOS/RHEL 5 :
rpm -Uvh https://dl.fedoraproject.org/pub/epel/epel-release-latest-5.noarch.rpm
CentOS/RHEL 6 :
rpm -Uvh https://dl.fedoraproject.org/pub/epel/epel-release-latest-6.noarch.rpm
CentOS/RHEL 7 :
rpm -Uvh https://dl.fedoraproject.org/pub/epel/epel-release-latest-7.noarch.rpm
Ok,安装完毕。
使用EPEL源安装软件
现在就可以执行:yum install 软件包名进行安装了,nginx、openvpn、htop、ncdu等等一些常用的软件都灰常简单的装上了。
原文:http://www.vpser.net/manage/centos-rhel-linux-third-party-source-epel.html
wget -c --referer=引用地址 -O 文件名 "真实下载地址"
In this section, we will analyze real-world examples of programs that
call the gethostbyname*() functions, but we first introduce a small test
program that checks whether a system is vulnerable or not:
[user@...ora-19 ~]$ cat > GHOST.c << EOF
#include <netdb.h>
#include <stdio.h>
#include <stdlib.h>
#include <string.h>
#include <errno.h>

#define CANARY "in_the_coal_mine"

struct {
  char buffer[1024];
  char canary[sizeof(CANARY)];
} temp = { "buffer", CANARY };

int main(void) {
  struct hostent resbuf;
  struct hostent *result;
  int herrno;
  int retval;

  /*** strlen (name) = size_needed - sizeof (*host_addr) - sizeof (*h_addr_ptrs) - 1; ***/
  size_t len = sizeof(temp.buffer) - 16*sizeof(unsigned char) - 2*sizeof(char *) - 1;
  char name[sizeof(temp.buffer)];
  memset(name, '0', len);
  name[len] = '\0';

  retval = gethostbyname_r(name, &resbuf, temp.buffer, sizeof(temp.buffer), &result, &herrno);

  if (strcmp(temp.canary, CANARY) != 0) {
    puts("vulnerable");
    exit(EXIT_SUCCESS);
  }
  if (retval == ERANGE) {
    puts("not vulnerable");
    exit(EXIT_SUCCESS);
  }
  puts("should not happen");
  exit(EXIT_FAILURE);
}
EOF

[user@...ora-19 ~]$ gcc GHOST.c -o GHOST

On Fedora 19 (glibc-2.17):

[user@...ora-19 ~]$ ./GHOST
vulnerable

On Fedora 20 (glibc-2.18):

[user@...ora-20 ~]$ ./GHOST
not vulnerable
修复漏洞
升级glibc库
RHEL/CentOS : sudo yum update glibc
Ubuntu : sudo apt-get update ; sudo apt-get install libc6
参考:http://www.openwall.com/lists/oss-security/2015/01/27/9
yum -y install iotop  或
sudo apt-get install iotop
官网:http://guichaz.free.fr/iotop/
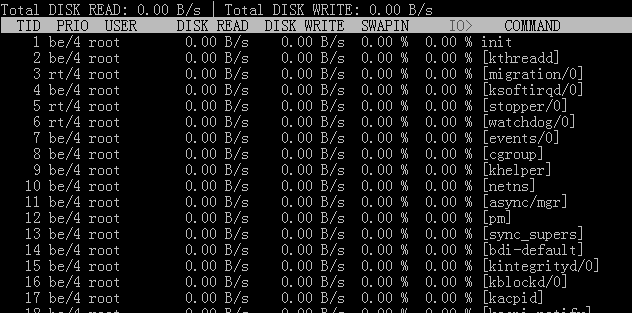
用法 iotop -参数
–version 查看版本信息的
-h, –help 查看帮助信息的
-o, –only 只显示在划硬盘的程序
-b, –batch 批量处理 用来记录日志的
-n NUM 设定循环几次
-d SEC, –delay=SEC 设定显示时间间隔
其中按 r 是反顺序排列,按 o 为动态切换,按q退出。
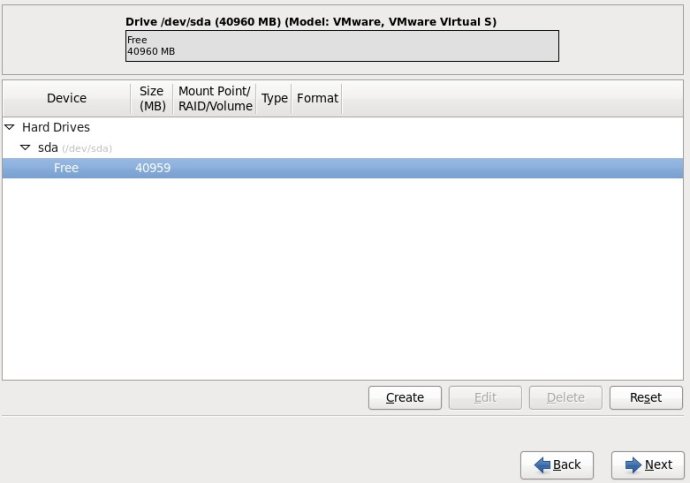
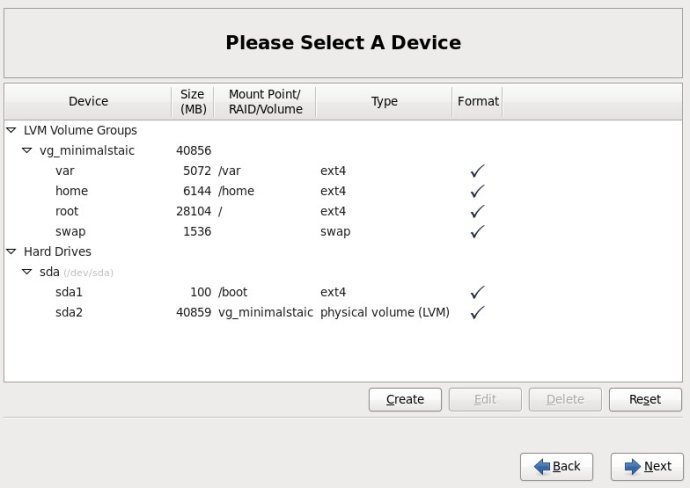
1.选择Free行,再点击Create按钮;
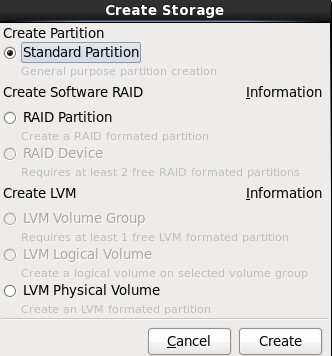
2.选择“Create Partition”选项中的“Standard Partition”,然后点击Create;
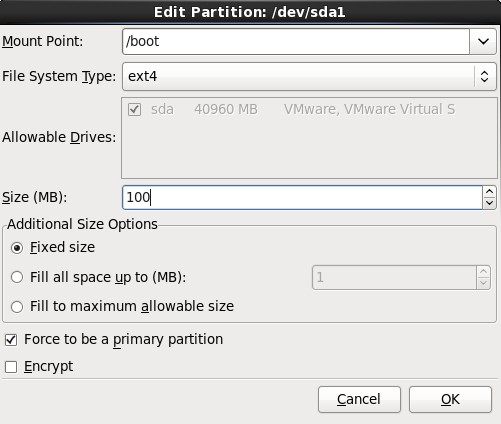
3.在挂载点上选择“/boot”,文件系统类型中选择“ext4”,大小填写100(单位为MB),然后在“Additional Size Options”区域选择“Fixed size”选项,最后再勾选“Force to be a primary partition”,最最后点击OK按钮;
4.选择剩下来的Free行,点击Create按钮,在弹出的对话框中选择“Create LVM”选项中的“LVM Physical Volume”单选按钮,最后单击Create;

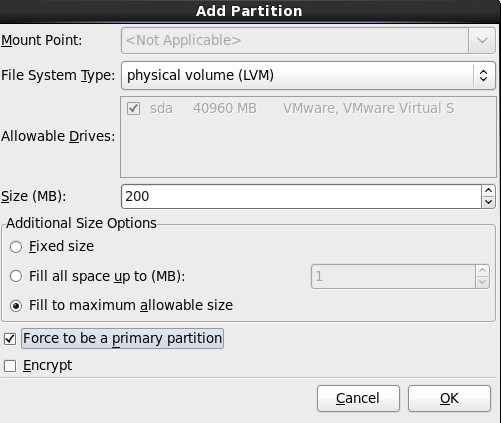
5.在弹出的“Add Partition”对话框中,在“Additional Size Options”区域选择“Force to be a primary size”选项,最后再勾选“Force to be a primary partition”,最最后点击OK按钮;
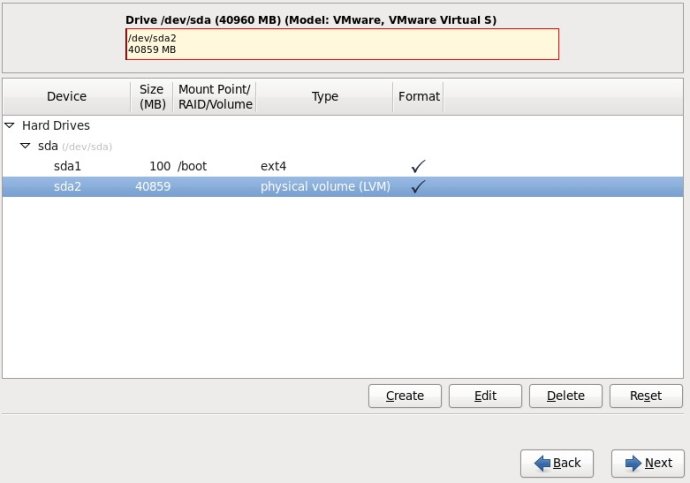
6.选中sda2这一行,单击“Create”按钮,(千万不要单击“Edit”,不然的话,会回到Standard Partition模式)
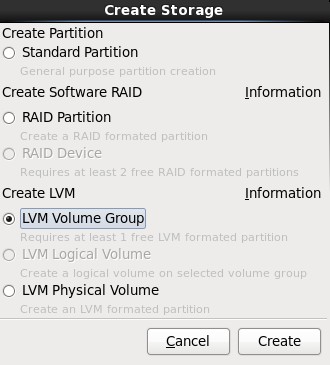
7.在弹出的“Create Storage”对话框中,选择“Create LVM”区域中的“LVM Volume Group”选项,最后单击Create按钮;
8.在弹出的“Make LVM Volume Group”对话框中,指定“Volume Group Name”的名称(不能包含空格)和“Physical Extent”的大小,默认为4M,最后点击OK按钮;(也可以在这里直接点击Add按钮添加LVM logical Volume)
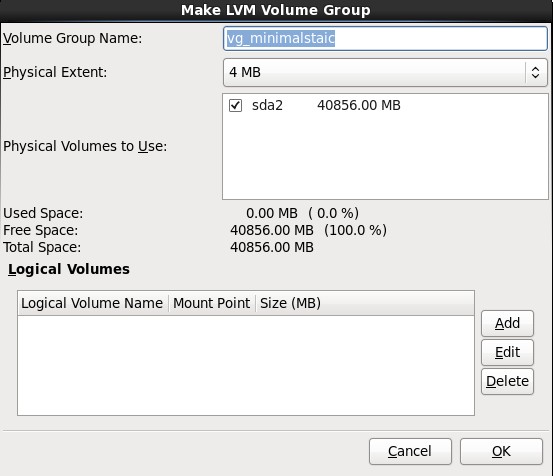
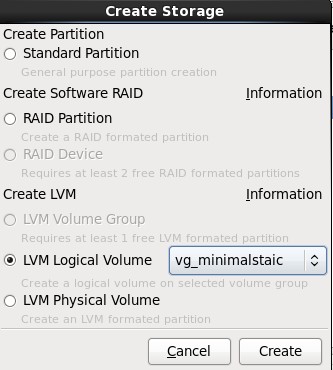
9.单击上图中的Add按钮,在弹出的“Create Storage”中选择“Create LVM”区域中的“LVM Logical Volume”,最后单击Create按钮;
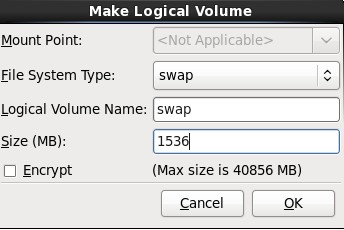
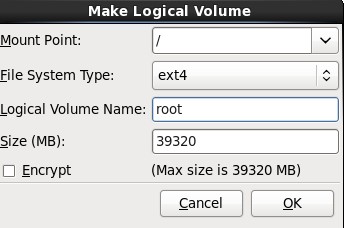
10.在弹出的“Make Logical Volume”对话框中指定挂载点、文件系统类型、逻辑卷的名字和卷的大小,最后单击OK按钮;(如果文件系统类型为swap,则没有挂载点)
11.接着挂载根(/);
12.最后分区图如下:
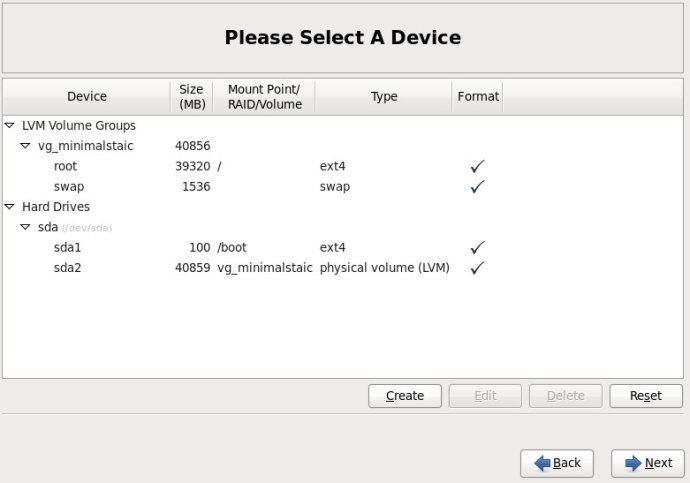
13.挂载所有分区后的截图如下:
参考:http://www.newsky.net.cn/help/Show.asp?id=13
使用dd命令创建一个swap分区
[root@localhost Desktop]#dd if=/dev/zero of=/home/swap bs=1024 count=1048576
#count的计算公式: count=SIZE*1024 (size以MB为单位)
这样就建立一个/home/swap的分区文件,大小为1G,接着需要格式化新建的SWAP分区:
[root@localhost Desktop]# mkswap /home/swap
再用swapon命令把这个文件分区变成swap分区
[root@localhost Desktop]#swapon /home/swap
#关闭SWAP分区命令为:[root@localhost Desktop]#swapoff /home/swap
再用free -m查看一下,可以看出swap扩大了。
为了能够让swap自动挂载,要修改/etc/fstab文件
vi /etc/fstab
在文件末尾加上
/home/swap swap swap default 0 0
这样就算重启系统,swap分区就不用手动挂载了。
参考:http://blog.chinaunix.net/uid-26881541-id-3347389.html
源代码安装
yum remove curl curl-devel

wget http://curl.haxx.se/download/curl-7.24.0.tar.bz2
tar xfj curl-7.24.0.tar.bz2
cd curl-7.24.0
./configure --prefix=/usr
make
make install
#check version
curl -V
./configure --with-curl=/usr --with-curlwrappers
参考:http://gadelkareem.com/2012/02/27/upgrade-curl-7-24-on-centos-6-2/
1、获取Squid源代码
wget http://www.squid-cache.org/Versions/v3/3.1/squid-3.1.9.tar.gz
2、编译及安装
tar -zxvf squid-3.1.9.tar.gz
cd squid-3.1.9
./configure --prefix=/usr/local/squid --enable-arp-acl --enable-linux-netfilter --enable-pthreads --enable-err-language="Simplify_Chinese" --enable-default-err-language="Simplify_Chinese" --enable-auth="basic" --enable-baisc-auth-helpers="NCSA" --enable-underscore
make
make install
3、编译生成Squid认证程序ncsa_auth
cd helpers/basic_auth/NCSA/
make
cp ncsa_auth /usr/sbin/
cd ../../../
4、使用htpasswd来生成用户名/密码对应的文件
htpasswd -c /usr/local/squid/password <用户名>
5、修改Squid配置文件
cd /usr/local/squid/
mv -f etc/squid.conf etc/squid.conf.bak
vi etc/squid.conf

# 插入如下内容


acl SSL_ports port 443
acl Safe_ports port 80      # http
acl Safe_ports port 21      # ftp
acl Safe_ports port 443     # https
acl Safe_ports port 70      # gopher
acl Safe_ports port 210     # wais
acl Safe_ports port 1025-65535  # unregistered ports
acl Safe_ports port 280     # http-mgmt
acl Safe_ports port 488     # gss-http
acl Safe_ports port 591     # filemaker
acl Safe_ports port 777     # multiling http
acl CONNECT method CONNECT

auth_param basic program /usr/sbin/ncsa_auth /usr/local/squid/password
acl normal proxy_auth REQUIRED
http_access allow normal

# Deny requests to certain unsafe ports
http_access deny !Safe_ports

# Deny CONNECT to other than secure SSL ports
http_access deny CONNECT !SSL_ports

# And finally deny all other access to this proxy
http_access deny all

# Squid normally listens to port 3128
http_port 3128

# We recommend you to use at least the following line.
hierarchy_stoplist cgi-bin ?

# Uncomment and adjust the following to add a disk cache directory.
#cache_dir null /tmp

# Leave coredumps in the first cache dir
coredump_dir /usr/local/squid/var/cache

# Add any of your own refresh_pattern entries above these.
refresh_pattern ^ftp:       1440    20% 10080
refresh_pattern ^gopher:    1440    0%  1440
refresh_pattern -i (/cgi-bin/|\?) 0 0%  0
refresh_pattern .       0   20% 4320
6、启动Squid
./sbin/squid
转载:http://www.oschina.net/code/snippet_4873_1535